Showing posts with label upstairs bathroom. Show all posts

Saturday, October 3, 2009

Upstairs Bathroom Layout


Someone asked us for more detail about the layout of our upstairs bathroom. Here is the layout with dimensions. It took us a really long time to come up with this layout. The stack in the corner precluded more standard layouts and we were determined to not be able to wash our hands while sitting on the toilet!

There is quite a bit of room around the toilet in this layout so it could probably be done with a less wide bathroom and depending on the size of the stack and how small the framing can be done around it you might also be able to get away with the room being shorter too. The measurements are pretty important for making this layout work, if you're doing it yourself measure everything really carefully (just to make sure the vanity will fit etc.).

This layout is nice because it makes the room feel really spacious when you walk in (because you walk into the largest open space in the room). One consideration is to make sure you get a good shower curtain solution otherwise the vanity can get splashed a little, but we haven't found it to be a huge problem.

Our contractor neighbor actually re-created the layout of our bathroom for one of our other neighbors that also had a badly placed stack. It was kind of funny and flattering, although having him come over every morning to measure stuff was a bit odd.

Here's some pictures of what it looks like in real life, there are more throughout the blog too ;o).

Wednesday, August 5, 2009

Dirty business!

After a couple of months living with our toilet choices we figured it is time to weigh in on their performance.

Basement bathroom: American Standard Cadet 3

Spec:
- ~$180
- Round bowl
- 2 piece
- map score: 1000
Overall we're pretty happy with this toilet. It's flushing power is really awesome. It also has a high water spot. The water spot was a big deal for me. In our last place we had one toilet with a high water spot and one with a low water spot, and the one was filthy a lot of the time. Given that this toilet was in our basement bathroom, it's size and price were also big selling factors. The main downside of this toilet is that it's bowl is a quite small. Larger people may not be so comfortable on this toilet.

Upstairs bathroom: Kohler Archer
Spec:
- ~$350
- Elongated bowl
- Comfort height
- 2 piece
- map score: 800
This toilet came to us by chance. We were planning on getting the Cadet 3 in it's 1 piece version for upstairs, but saw that the Kohler was a similar price and it matches our vanity. Surprisingly this toilet extends the same distance from the wall as the smaller Cadet 3 (this was a big surprise!). It's basic performance is good. The map score so far has been adequate and it also has a nice high water spot. The comfort height is not so comfy for shorter people, but overall it's not a huge down fall. The main point I'd fault this toilet on is the design of the mechanism inside the tank. The chain attached to the flusher lever wraps around the lever very easily. This results in the toilet filling and filling and filling until the problem is rectified. We had a bad situation where this occured before bed and the thing wasted water all night long (all the cold water pipes in our house were dripping with condensation :oS). A quick fix with a paper clip fixed the issue, but to have to "doctor" a toilet in this price range is kind of pathetic :oP

Sunday, June 21, 2009

New trick!

I recently downloaded Picasa to give it another try. One neat feature in the current version is "collages" where you can make a collage from sets of pictures.

Here are some collages made with the bathroom pictures. I expect that we will use this a lot in our blog in the future.

Before

During

After

Monday, May 11, 2009

Upstairs bathroom finally done

We stopped counting days when the bathroom started to function (and because the amount of time trim/finishing stuff takes is way to depressing to think about) but now it is finally pretty much done (aside from a flange we ordered online and other tiny things but yee... lets call it done). Here are some pics.


Sunday, May 3, 2009

Upstairs bathroom: day 23


The end is in sight now. We just need to install the door, fill/paint the trim and a variety of other small tasks.

And to think 21 days ago we were looking at this:


never mind that we look a bit like sleep deprived zombies and have done nothing but this bathroom for the past 23 days... *le sigh*

Thursday, April 30, 2009

Upstairs bathroom: day 19-20

Tiling is taking a bit longer than expected.. but we should be finished up tomorrow. Laying out the marble is an exercise in patience/frustration. This would have definitely been a task worth hiring out :oP .


Tuesday, April 28, 2009

Upstairs bathroom: day 18


Primer, grout and 1 potlight (need another light bulb :oP ).

Tomorrow: hopefully some floor tile and/or paint.

This bathroom has been a bit of a slog, but it's starting to look like it might look good so we're getting motivated to get it done. I'm especially excited to see the wall color with the marble mini-brick tiles. :o) .

Sunday, April 26, 2009

Upstairs bathroom: Day 16

Drywall is taped, wall tile is hung.. time for a beer methinks...


this is more tile than we ever ever want to hang again...

Tuesday, April 21, 2009

Upstairs bathroom: day 11


Blue board and denshield are up.

We also went and got our tiles/vanity last week. Here's what we've ended up with. The tiny black thing on the tile is a cutout of our vanity... kind of a lo-tech photoshop I guess...


Saturday, April 18, 2009

Yay for E-bay!

After buying our new vanity we've been a bit stressed trying to find an inexpensive faucet that would fit the 8 inch center faucet holes that we ordered it with. Today we lucked out and won a nice faucet on E-bay for much much less than it retails for.


It doesn't really go with the vintage theme we originally had in mind, but with the new vanity and different floor tile our original plan is pretty much out the window ;oP . We'll see where this goes...

Wednesday, April 15, 2009

Even the best laid plans....

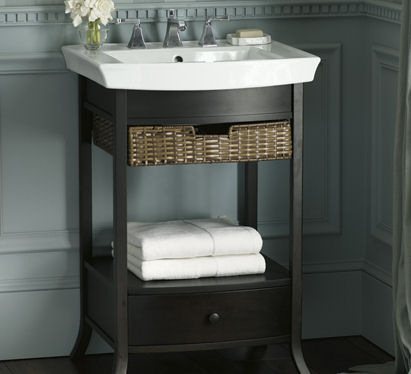
In our quest for the American Standard Williamsburg vanity from our previous post we hit a small snag. Big orange is the only store to stock this vanity.. and the fastest they can get it would be in 35 days. It's cute, but we're not prepared to wait 5 weeks for it. So tonight we headed to the western portion of the city (did we mention that relative to Calgary, driving in Toronto sucks?). We made our way to Taps Bath and ordered this vanity which we will be able to pick up in a couple of days.


It's a bit of a departure from the vintage look of the Williamsburg vanity but we really liked the look of it so we figure we'll fit it in. This vanity takes a wide set faucet which means we're back to the drawing board trying to find a cheap/pretty faucet. We also had a bit of a reality check when we revisited the pricing on the pretty hex floor tiles we were planning on using...

So all in all it looks like we're kind of back to the drawing board for the styling of the upstairs bathroom. Most likely we'll substitute the hex floor tiles for some 12x12 white marble tiles. This will help us save some $$ and will reduce the vintage feel a bit so the new vanity won't look quite so out of place. Lets hope this works... and that we don't have to sell our first born to pay for this room :oP .

Shiny new....

Vent!


Plumbing!


Wiring!


(well... the room was rewired with the rest of the house... we just moved the fixtures around)

Monday, April 13, 2009

Rebuilding begins

Since we last posted we've started rebuilding the bathroom. We got the electrical and HVAC fixing done. We had a vent blowing into the attic of the kitchen (basically out the back of the house) that we rerouted to heat the bathroom (much more useful). Now the bathroom doesn't share a vent with the guest bedroom and there isn't a path for north winds to blow into the bedroom.

On Sunday we tackled the electrical and today we started the drains. So far we've got the toilet/tub drains and the vent for the vanity. Hopefully we will be able to have a floor again by the weekend. Teetering around on floor joists is losing its novelty and we're getting a bit nervous about messing up the drywall ceiling below with all the cutting/banging :S.

Saturday, April 11, 2009

We recycle!

... but not today!


Most of the upstairs bathroom was taken away in many pieces in a dumpster today. The rest is sitting in the second dumpster on our lawn.


many tiny window weights for the 1 little window.

Rebuilding will probably start tomorrow. We were going to take a break but a certain handyman is eager to start playing with all the ABS/doodads we picked up at Home Depot.

Monday, April 6, 2009

Design for the upstairs bathroom

We'd be lying if we said we know anything about design... but here's what we've got planned for the upstairs bath. With a bit more of a budget for this bathroom we're planning to splash out a little.

The current bathroom layout leaves a lot to be desired... although being able to wash your hands while sitting on the toilet was a neat feature *sarcasm*. In some ways, delaying this project has been good because it took us this long to find a layout that would minimize space issues. We have a stack in 1 corner of the bathroom that precludes a more efficient layout with the tub across the wall with the window on it. After months of thinking about it, we've arrived at the following design.


There is a bit of unused space behind the tub by the toilet. We'll put some shelves there for some extra storage. The vanity is going to be a bit small so we'll probably need the extra space. Below is the vanity we're looking at getting. It's an American Standard from Home Depot. We'll be pairing it with the same Glacier Bay faucet that we used downstairs.


For the floor tile we're planning to use hexagon white marble tiles. The picture below is from DoorSixteen's really pretty upstairs bathroom.


The walls will include copious amounts of our 4x8 white subway tiles, and some wayside inn grey paint (this is the same tile/color we used in the basement bathroom). We're still playing around with what to do for an accent tile (if we do one) and where exactly we'll put the tile. It's less than 2.50/sqft so we can afford to go a bit nuts :D.

Upstairs bathroom your days are numbered!

With the basement bathroom functional we've booked the dumpster to take the remains of the upstairs bathroom for Thursday night. It will be a long Easter weekend of demo and dirt. Here are some pictures of what the upstairs bathroom looks like now (and 1 from before we moved in).


Above you can see damage from the electrician as well as some "artistic" welding we did to install the shower kit/new supply lines without removing large segments of the floor.


We thought this project or the kitchen would be our first project when we started this adventure in masochism but we really underestimated how nice it is to have a living room that isn't dirty and gross. So now, months later we finally get to this project!

Saturday, September 13, 2008

Dreaming of Bathroom...

This project is a long way off, but I am really anticipating having a bathroom that does not have a hole in the floor. Sometimes Bren gets on my case about dreaming about next projects when currently the main floor barely has walls. I have to argue though, that it's kind of like when people are in a situation where they don't have food for a long time and they dream about the next meal they will have. Any who... this is my dream for the bathroom...

Originally we were planning light blue/white really spa like and pristine like out old bathroom (below)


The plan hasn't changed too much. There's still gonna be lots of white. But now I'm leaning towards more yellowy off-white/white/black for a color scheme. Below are some inspiration pictures for various aspects of our room.


Floor (Our Fixer Upper)
Vanity (Rona's Odessa 2 door)
Light fixture (Home Depot)
Shower kit (E-bay)

Sunday, July 27, 2008

Shower Enclosure


Since we are going to want to take showers right away once we move into the new place we were looking at many different places where we might be able to pick up a shower enclosure. We found the perfect one here from vintagetub.com. It has a nice faucet along with a telephone shower attachment for when our little dog needs a bath, and it is a tub wall mount(like our existing one at right).


Fortunately we asked the good people at ourcastle how their order from vintage tubs went and they reminded us why UPS sucks for shipping to Canada(see comments). So we went hunting all over the internet for a shower enclosure that included a telephone attachment for less than 1000$. This search proved to very difficult, all the sites that listed a similar item linked back to vintagetub.com. I had almost given up finding one and just forking over the 300$ in 'brokerage fees' to UPS and then I found this on ebay!


It seems like it will be perfect, it even comes with supply lines which will eventually save us over 200$.

After purchasing this on ebay I received a reply from the folks at vintagetub from a question I had sent them earlier and it turns out that they will ship using Fed-Ex or USPS upon request after all. I replied and suggested that they make this clearer on their website and informed them of the hazards of shipping to Canada with UPS.